One of the most important aspects of boat maintenance is ensuring that the engine’s cooling system is functioning correctly. Most boat engines have a telltale (also known as a “pee hole”) that sprays water, indicating that the cooling system is working properly.
However, if you notice that your boat engine is not “peeing,” it’s essential to diagnose and fix the problem to avoid overheating and damaging the engine. In this article, we will discuss the common reasons behind a boat engine’s lack of telltale output and offer detailed steps for diagnosing and resolving the issue.
Which Marine Engines Have a Tell Tale (Should be “Peeing”)
Outboard engines typically have a telltale, also known as a “pee hole” or “water stream indicator.” This feature is a visible indicator of the proper functioning of the engine’s cooling system.
Inboard and sterndrive engines, on the other hand, usually do not have a telltale. Instead, these engines use a closed or semi-closed cooling system, where the engine’s coolant circulates through a heat exchanger, which is cooled by water pumped from the outside. The water is then expelled back into the body of water that the boat is operating in. Since the cooling water doesn’t flow directly through the engine, there isn’t a need for a telltale as a visual indicator.
That being said, it is essential to regularly check and maintain the cooling system in inboard and sterndrive engines to ensure they are functioning correctly and to prevent potential damage from overheating.
Reasons Your Outboard Engine isn’t Peeing
Blocked Telltale Outlet
The most common reason for a lack of water flow from the telltale is a blocked outlet (see picture below). Debris, such as dirt, seaweed, sand, or even small marine organisms, can accumulate in the telltale outlet and obstruct the water flow.
How to diagnose: Visually inspect the telltale outlet for any visible obstructions. You may also use a flashlight to better see inside the opening.
How to fix: Remove any visible debris from the telltale outlet with a small tool like a paperclip or a piece of wire. Be careful not to push the debris further into the system. After clearing the blockage, start the engine and check for water flow. If the problem persists, proceed to the next potential cause.
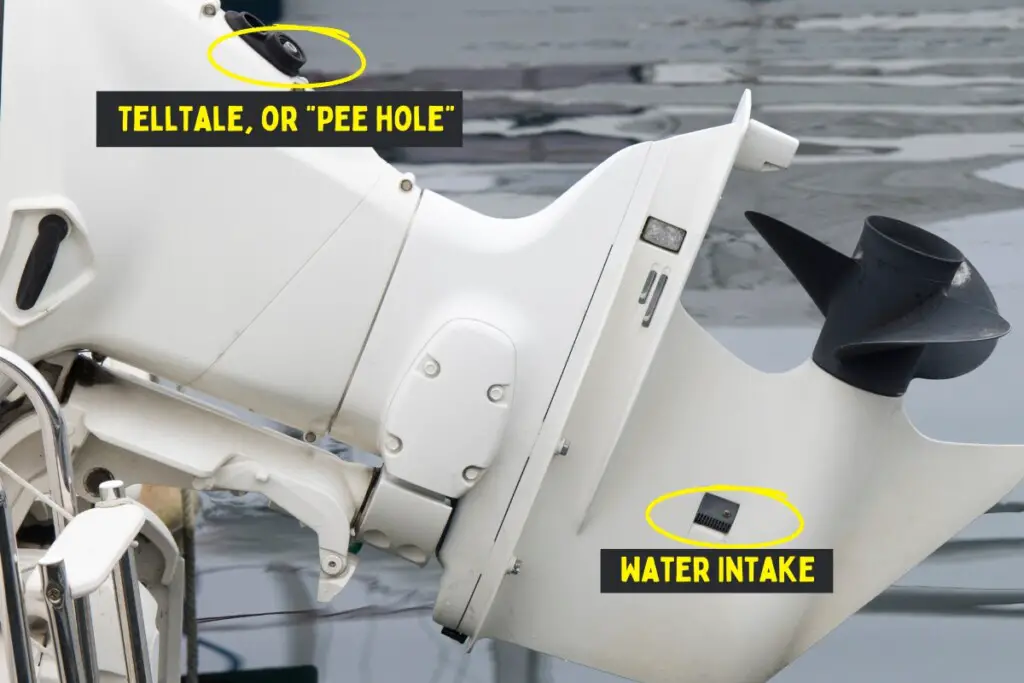
Clogged Water Intake
The water intake (see above picture) is another potential point of blockage in the cooling system. Like the telltale outlet, debris or marine growth can accumulate in the intake, restricting the water flow necessary for cooling the engine.
How to diagnose: Inspect the water intake grates, usually located on the lower unit of the outboard or sterndrive engines. Check for any debris, mud, seaweed, or marine growth that could obstruct the intake.
How to fix: You’ll want to clean the water intake grates by removing any debris or growth. You may use a brush, a scraper, or a similar tool. Once you’ve got it cleaned up, restart the engine and check for water flow from the telltale. If there’s still no water flow, move on to the next potential cause.
Clogged Cooling System Hoses
The water lines that carry the water through the whole system and end at the “pee hole” can be clogged at any point — not just at the telltale outlet.
How to diagnose: With the engine off, work backward from the telltale outlet and start unhooking each segment of water line one at a time. See if you can blow through it with your mouth or if they’re obstructed.
How to fix: Once you’ve found an obstructed line, use compressed air or gently use a flexible wire to clear out the blockage. Hook everything back up as it was before and test. If no blockages were found, let’s proceed to the next possible reason.
Damaged or Leaking Cooling System Hoses
This step should, with common sense, go hand in hand with the previous one since we’re working with the same hoses. The hoses in the cooling system can become damaged, cracked, or loose over time, leading to leaks or restricted water flow. If water is leaking out a crack in the hose upstream of the “pee hole”, then it is not going to make it to the “pee hole” for you to witness.
How to diagnose: Inspect the cooling system hoses for any signs of damage, wear, or leaks. Look for any kinks, cracks, or loose connections that could affect the water flow.
How to fix: Replace any damaged or worn hoses, and tighten any loose connections. After making repairs, restart the engine and check for water flow from the telltale. If the issue remains unresolved, proceed to the next potential cause.
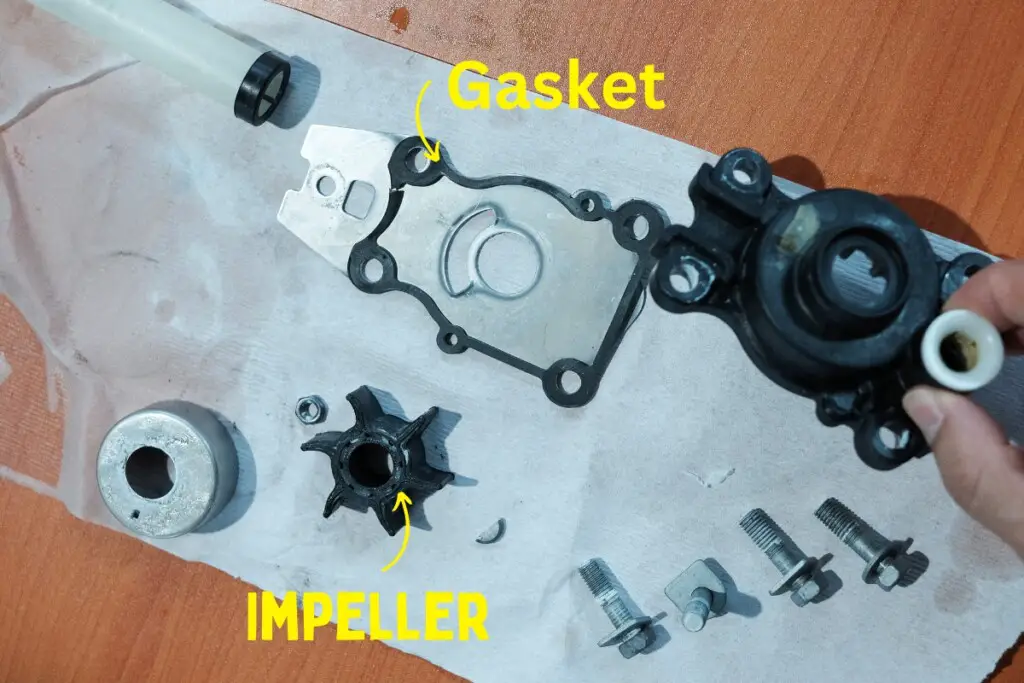
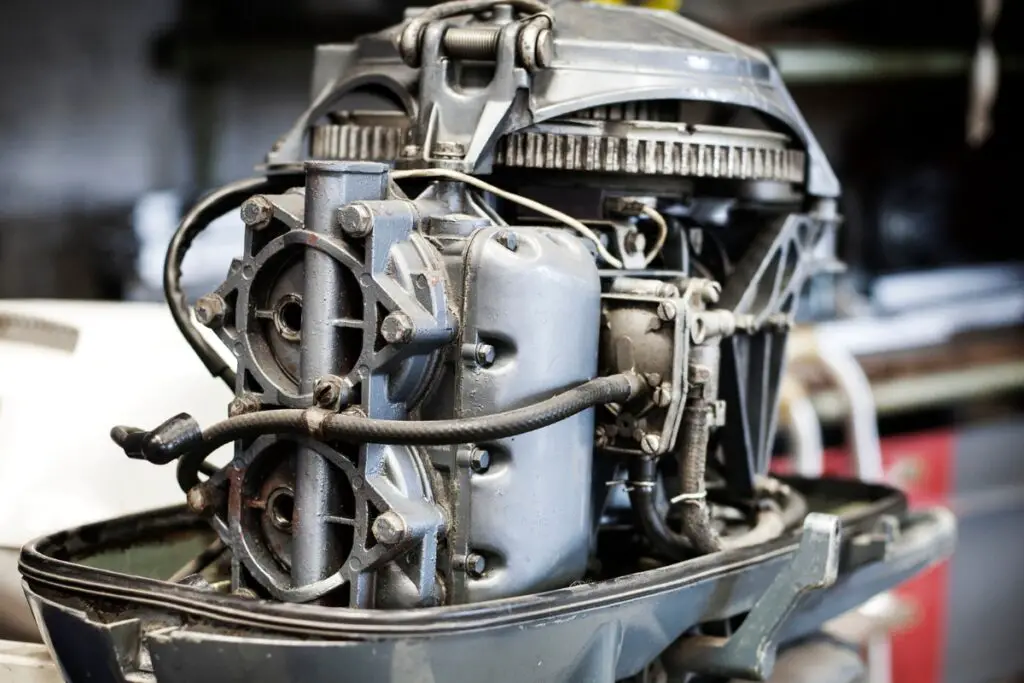
Faulty Water Pump Impeller
The water pump impeller is responsible for drawing water into the cooling system and circulating it through the engine. A damaged or worn impeller can result in a reduced water flow or even a complete lack of flow through the telltale.
How to diagnose: If you’ve ruled out blockages in the telltale outlet, water intake, or in any of the hoses along the line, then the impeller is likely the issue. Remove the lower unit or gearcase of the outboard engine to access the water pump. Inspect the impeller for wear, damage, or deformation.
Inspect the gasket, as a damaged gasket will cause a drop in pressure and will result in water not going through the “pee hole”.
Make sure the Woodruff key is in place which makes the impeller spin when the spindle does, as it binds them together. A missing Woodruff key will cause the spindle to spin but the impeller will do nothing since it’s not tied to the spindle.
How to fix: Replace the faulty impeller with a new one, ensuring that it’s the correct model for your engine. Replace the gasket and Woodruff key if necessary. Reassemble the lower unit or gearcase, restart the engine, and check for water flow from the telltale. If the issue persists, continue to the next possible cause.
Faulty Thermostat
The thermostat regulates the flow of water through the cooling system to maintain the engine’s optimal operating temperature. A faulty thermostat can become stuck in the closed position, which will prevent water from circulating and cause the telltale to stop working.
How to diagnose: If you’ve ruled out all other possible causes, the thermostat is likely the issue. Locate the thermostat housing on the engine (refer to your engine manual for the exact location), and remove it to inspect the thermostat.
How to fix: If the thermostat appears stuck or damaged, replace it with a new one. Reassemble the thermostat housing, restart the engine, and check for water flow from the telltale. If the problem persists, consult a marine mechanic for further diagnosis and assistance.
Generally, the steps to remove, test, and replace a thermostat are as follows:
- Locate the thermostat: First, identify the location of the thermostat by referring to your engine’s manual or online resources. The thermostat is usually housed in a thermostat housing or cover, which is connected to the engine block and the coolant hoses.
- Remove the thermostat: Disconnect any hoses, clamps, or fasteners, and carefully remove the thermostat housing cover (usually 2x10mm bolts) to access the thermostat. Remove the thermostat from its seat.
- Inspect the thermostat: Visually inspect the thermostat for any signs of damage, corrosion, or debris. If it appears to be in poor condition, it’s best to replace it.
- Test the thermostat:
- Boiling water test: Fill a pot with water and heat it on a stove until it reaches the thermostat’s opening temperature (usually marked on the thermostat itself or specified in the engine manual). Place the thermostat in the boiling water using tongs or a similar tool. Observe if the thermostat valve opens as the water reaches the specified temperature. If it doesn’t open, the thermostat is faulty and should be replaced.
- Cold water test (optional): After performing the boiling water test and confirming that the thermostat opens, you can also test its closing function. Remove the thermostat from the boiling water and place it in a container filled with cold water. The thermostat valve should close as it cools down. If it doesn’t close, the thermostat is faulty and should be replaced.
- Reinstall or replace the thermostat: If the thermostat is functioning correctly, you can reinstall it in the engine, making sure to replace the gasket if necessary. If the thermostat is faulty, replace it with a new one that matches the specifications for your engine.
- Reassemble the thermostat housing: Once the thermostat is reinstalled or replaced, reattach the thermostat housing cover but gently torque them down. The cover is generally made of aluminum and will easily crack if you try to overtighten. Go ahead and reconnect any hoses, clamps, or fasteners and test your engine again.
Final Takeaways
It’s crucial to promptly address any issues with your boat engine’s telltale to avoid potential damage due to overheating. If you follow the steps outlined above, you’ll be able to better diagnose and fix the most common causes for a boat engine not “peeing.” Regular maintenance and inspections will help ensure your boat’s engine cooling system functions effectively and keeps your engine running smoothly.