As a boat owner, you may have noticed water accumulating in the bilge of your vessel and wondered if this is normal or cause for concern. The bilge is the lowest part of a boat’s hull, where water naturally tends to collect due to gravity.
While it’s common for some water to be present in this area, understanding the source of the water and how to properly manage it is essential for maintaining the integrity of your boat and ensuring a safe boating experience.
In this comprehensive article, we will explore the various reasons water might accumulate in your boat’s bilge, discuss whether it’s normal to have water in the bilge, and offer tips on how to manage and prevent water accumulation.
We’ll also address the importance of a functional bilge pump, proper boat maintenance, and ways to identify potential issues before they become serious problems.
So, let’s dive in and learn everything you need to know about water in your boat’s bilge and how to keep your vessel in top shape for your next adventure on the open water.
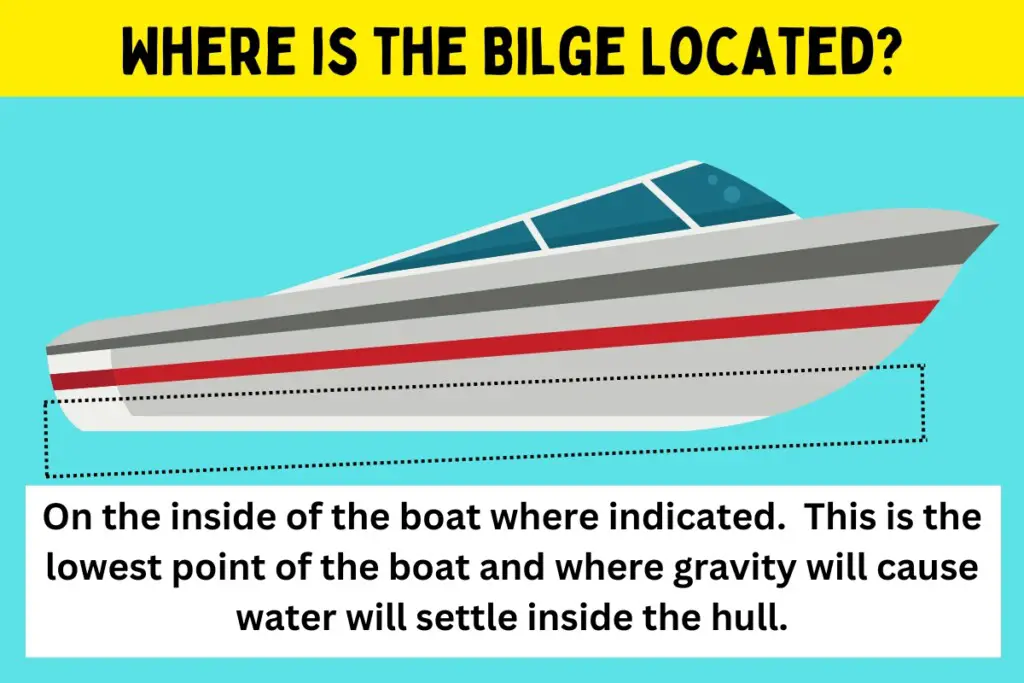
What is a Bilge?
To understand the presence of water in a boat, it’s essential to know what a bilge is. The bilge is the lowest point of a boat’s hull, where water tends to collect due to gravity. This area is typically fitted with a bilge pump, designed to expel accumulated water to keep the bilge dry and prevent the boat from taking on too much weight.
Is It Normal to Have Water in the Bilge?
It is generally normal to have a small amount of water in the bilge of your boat if it can be reasonably expected and explained.
For instance, if you know that you experience some water in your bilge when your live well is full and running and it happens every time, then I wouldn’t be concerned (in the sense that it’s an immediate problem that warrants immediate action). There’s likely a hose fitting that is compromised and is dripping, or water may even be overflowing and working its way down a screw hole that holds the livewell in place.
However, all of your valves are sealed to the outside of the hull, your livewell is not running, you’ve inserted the plug properly, you’ve checked for any damage to the hull before launch, you haven’t experienced rain, your boat’s gunnel was bone dry, and all of the sudden you see water shortly after launching — then you definitely have water that is not normal and should be investigated.
As mentioned earlier, water can enter the bilge through various means, and a functioning bilge pump should be able to expel this water efficiently. However, it is essential to regularly inspect your bilge and monitor the amount of water present to ensure that there are no underlying issues that require attention.
Pro Tip: Can’t find the exact source of a small leak in the hull? Dry the area down as best as possible and then sprinkle baby powder in the affected area. Watch for fresh water paths that cut their way through the powder and follow them back to the source.
Causes of Water in the Bilge
There are several reasons why water can find its way into the bilge of your boat. Some of these causes are normal and expected, while others may indicate a problem. Common causes of water in the bilge include:
- Rain and Splashing: Water can enter the bilge through open hatches, portholes, or even from splashing as the boat moves through the water. This is generally considered normal, especially if the water accumulation is minimal.
- Condensation: In some cases, condensation from air conditioning units or temperature differences between the interior and exterior of the boat can lead to water accumulating in the bilge.
- Leaks: Water can also enter the bilge due to leaks from various parts of the boat, such as the hull (rivets, welds, a separation of layers between the bumper rail and the hull at the gunnel), plumbing (livewell or any other water source with tubing), or through-hull fittings (those that hold the outboard engine on the transom are known for this problem). Leaks may require immediate attention to prevent further damage or sinking.
- Engine Cooling System: Boats with inboard engines often use water to cool the engine, which then flows into the bilge. A small amount of water in the bilge from this source is normal, but excessive water could indicate a problem with the cooling system.
- Plug: If the plug to your transom has a compromised seal, is cross-threaded, or if you didn’t insert it properly, this would definitely lead to lots of water in your bilge.
What to Do If You Find Water in the Bilge
If you find water in the bilge of your boat, it’s important to take the following steps:
- Inspect for Leaks: Regularly inspect your boat’s hull, plumbing, and through-hull fittings for signs of leaks. Address any leaks immediately to prevent further damage or sinking.
- Test the Bilge Pump: Ensure that your bilge pump is functioning properly and is capable of expelling water efficiently. Regularly clean the pump’s strainer and check for any obstructions that may impede its performance.
- Monitor Water Levels: Keep an eye on the water levels in your bilge to determine if they are increasing, decreasing, or remaining consistent. Increasing water levels may indicate a problem that needs to be addressed.
- Maintain Proper Ventilation: Proper ventilation can help reduce condensation in the bilge area. Ensure that your boat is well-ventilated, especially in areas prone to condensation.
- Use a Bilge Sponge or Absorbent Pads: To help keep your bilge dry, consider using a bilge sponge or absorbent pads to soak up any residual water.
Pro Tip: If you’re boating in saltwater and have unexplained water in your bilge, taste the water to see if it’s salty or fresh, as that will help eliminate 50% of what could be wrong in an instant. If the water is fresh, the you know that the hull and all of the seals are working correctly and it’s likely an internal waterline from a livewell or some other freshwater source.

Step-by-Step on How to Test a Bilge for a Leak
- Prepare the boat: Begin by placing your boat securely on a trailer, ensuring it is level and stable. Make sure the boat is parked in an open area with good drainage, as water will be discharged during the testing process.
- Close all through-hull fittings: To accurately test for leaks, close all through-hull fittings, including those for the bilge pump, sink, and any other outlets that could allow water to escape from the bilge.
- Remove any items or equipment: Clear the bilge area of any loose items or equipment that might obstruct your view or prevent you from identifying the source of a leak.
- Fill the bilge with water: Using a garden hose, slowly fill the bilge with water. Monitor the water level as you fill to ensure it does not reach any electrical components or equipment that could be damaged by water.
- Monitor the outside of the hull: As you fill the bilge with water, carefully inspect the outside of the hull for any signs of escaping water. Look for drips, trickles, or streams of water that might indicate a leak in the bilge area.
- Mark the location of any leaks: If you identify any leaks, mark their location on the hull with a non-permanent marker or tape. This will help you locate the leaks later when it’s time to repair them.
- Drain the bilge: Once you’ve completed the test, drain the water from the bilge. Open the through-hull fittings and use the bilge pump to remove the water, or use a wet-dry vacuum to suction out the remaining water.
- Inspect the marked leaks: With the bilge drained, closely inspect the areas you marked during the test. Look for cracks, holes, or other damage that could be causing the leak. In some cases, the source of the leak might be obvious, while in others, further investigation or professional assistance may be required.
- Repair any leaks: Repair any identified leaks using the appropriate methods and materials, such as marine sealant, fiberglass, or epoxy. If you’re unsure how to repair the leaks, consult a marine professional for guidance. I personally recommend 3M 5200 (Amazon) or 4200, when repairing thru hull issues, but please check with your local marine expert to make sure this will be appropriate for your needs.
- Re-test for leaks: After repairing any leaks, repeat the testing process to ensure that all leaks have been successfully addressed. If additional leaks are found, repeat the repair and re-test process as needed.
By following this step-by-step process, you can effectively test your boat’s bilge for leaks and ensure that your vessel remains watertight and safe on the water. Regular inspections and maintenance are essential to prevent leaks and avoid potential damage to your boat.
Indicators that Your Bilge Pump is Not Working
For a quick reference, it’s good to know what the expectations are from a bilge pump. From my experience, there should be no more than 2″ of water in the bilge before the pump activates, and when it’s finished pumping the water level should be about 1/2″. The bilge pump should only leave about 1-2 gallons of water in the bilge after pumping if it has been functioning and installed correctly.
Keep an eye out if you notice any of the following:
- Rising water level in the bilge: If you notice that the water level in the bilge is rising and not being pumped out, this could be an indication that the bilge pump is not functioning properly.
- Unusual sounds: Listen for any strange noises coming from the bilge pump, such as grinding, whirring, or humming sounds, which might suggest a malfunction or blockage.
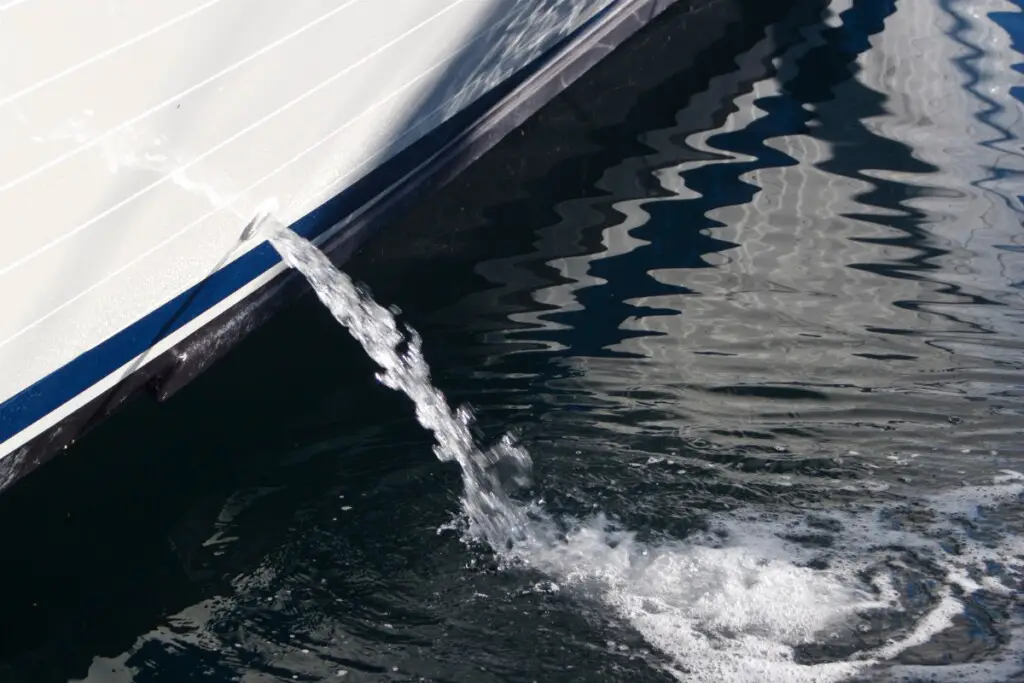
- No water discharge: When the bilge pump is working, you should see water being discharged overboard. If there is no water being expelled, it could mean that the pump is not operating.
- Frequent cycling on and off: If the bilge pump is frequently cycling on and off without effectively pumping out water, there may be an issue with the float switch or the pump itself.

How to Test a Bilge Pump
- Visual inspection: Start by performing a visual inspection of the bilge pump, its wiring, and connections. Look for any signs of damage, wear, or loose connections that may be causing the pump to malfunction.
- Test the float switch: The float switch is responsible for activating the bilge pump when water reaches a certain level. Lift the float switch manually to ensure that it’s working properly and activating the pump. If the pump doesn’t turn on, the issue could be with the float switch or the wiring.
- Check the power source: Ensure that the bilge pump is receiving power by checking the fuse, breaker, or battery connections. Replace any blown fuses and reset tripped breakers as needed.
- Test the pump manually: If the float switch is working correctly, you can test the pump manually by connecting it directly to a power source. If the pump doesn’t turn on when connected directly to power, the issue is likely with the pump itself.
- Inspect the impeller: The impeller is a key component of the bilge pump responsible for moving water. Remove the pump and inspect the impeller for any signs of damage or blockage, and clean it if necessary.
- Test the pump’s discharge: With the pump running, check the discharge hose and through-hull fitting to ensure that water is being pumped out effectively. Make sure there are no kinks, blockages, or leaks in the hose or fittings.
Remember that regular inspection and maintenance of your bilge pump are crucial for ensuring its proper function and the safety of your boat. If you continue to experience issues with your bilge pump after testing and troubleshooting, it may be time to replace the pump or consult a marine professional for further assistance.
Final Takeaways
Having a small amount of water in the bilge of your boat is generally considered normal if it can be reasonably explained and expected. However, it is crucial to monitor the water levels regularly and address any potential issues promptly to prevent damage to your boat.
By inspecting your boat for leaks, ensuring your bilge pump is functioning properly, and maintaining proper ventilation, you can keep your bilge dry and your boat in good working order. Remember that being proactive in your boat maintenance is key to enjoying a safe and enjoyable experience on the water.