Boating season is just around the corner and it’s time to do a dry run with your entire boating system to make sure everything is in working order before you get out on the water. One of the problems I had this year was a tilt/trim motor for my outboard that wouldn’t allow the engine to tilt all the way up.
In fact, it would get stuck about halfway up after struggling a bit.
If you’re new to this problem, you’re probably wondering what is going on and if it’s something you can fix or if it’s something you’ll need a professional to look at.
You’re in luck! This is a problem that can generally be handled at home with minimal tools and supplies required.
Let’s take a look at what is causing the problem, how to troubleshoot it properly, and the step by step process to get it fixed without needing professional assistance!
Why is my Outboard Not Tilting Properly?
There could be several reasons why your outboard motor isn’t tilting properly or is getting stuck. Some potential issues could include:
- Hydraulic fluid levels: The trim/tilt motor relies on hydraulic fluid to operate. If the fluid level is too low, the motor may not be able to generate enough force to tilt the engine. In this case, you’ll need to fill and possibly bleed the trim/tilt motor’s hydraulic system.
- Air in the hydraulic system: If there’s air in the hydraulic system, the trim/tilt motor may not operate properly. This often manifests as the motor making a whining or gurgling noise when operating. Bleeding the system can remove the air and restore proper function.
- Mechanical issues: If something is physically blocking the engine from tilting, it won’t be able to move. This could be due to a bent or broken trim rod, a damaged or dislodged trim tab, or some other physical obstruction. In this case, you’ll need to inspect the engine and possibly make repairs.
- Electrical issues: The trim/tilt motor is an electrically-powered hydraulic pump. If there’s an issue with the electrical supply, such as a dead battery or a blown fuse, the motor won’t be able to operate. Check the electrical connections and the battery.
- Hydraulic pump failure: If the hydraulic pump itself has failed, you’ll need to replace it. This would typically be accompanied by a complete failure of the trim/tilt motor to operate, rather than it simply getting stuck.
- Hydraulic seals failed: Replace cylinder caps and seals as needed, as they will no longer maintain proper pressure and the hydraulic system will no longer work.
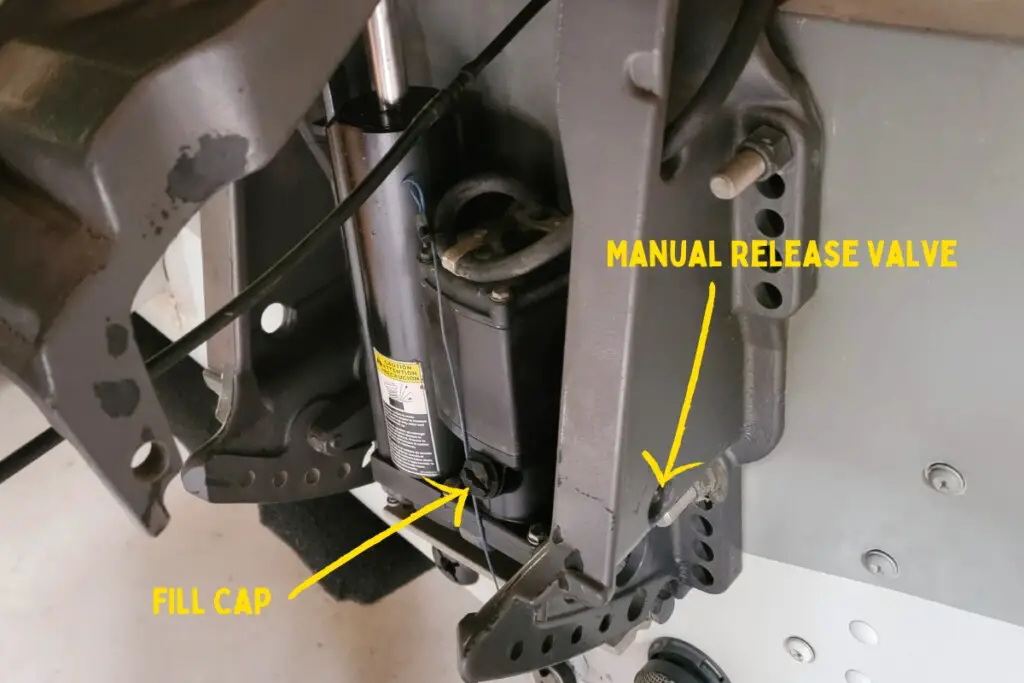
- Manual release valve: If the manual release valve is partially opened, it could prevent the hydraulic system from building up enough pressure to tilt the engine. Make sure the valve is properly closed.
For the sake of this article, we’re going to deal with reasons 1 and 2, since they are the most common and since I haven’t run across the other issues yet.
Materials Needed to Fix (Fill a Trim/Tilt Motor)
We’re going to assume that your problem is the common one which is not enough hydraulic fluid in your system or too much air. Even though many of these things (mine included) are self-bleeding, you can’t always rely on that to work flawlessly.
To fill and bleed a trim/tilt motor on an outboard, you will need the following:
- Power Trim and Tilt Fluid (Amazon)
- Large Flat-head Screwdriver
- Pump for Power Trim and Tilt Fluid (Amazon)
Yep, that’s pretty much it. If your fill cap on your motor won’t accept a screwdriver, then you may need a socket and ratchet to remove it, but that should be the only deviation from this list. Now, let’s talk about how to get you back up and running.
Step-by-Step Process to Fix a Stuck Outboard (Fill the Trim/Tilt Motor)
Step 1: Level Your Boat and Trailer
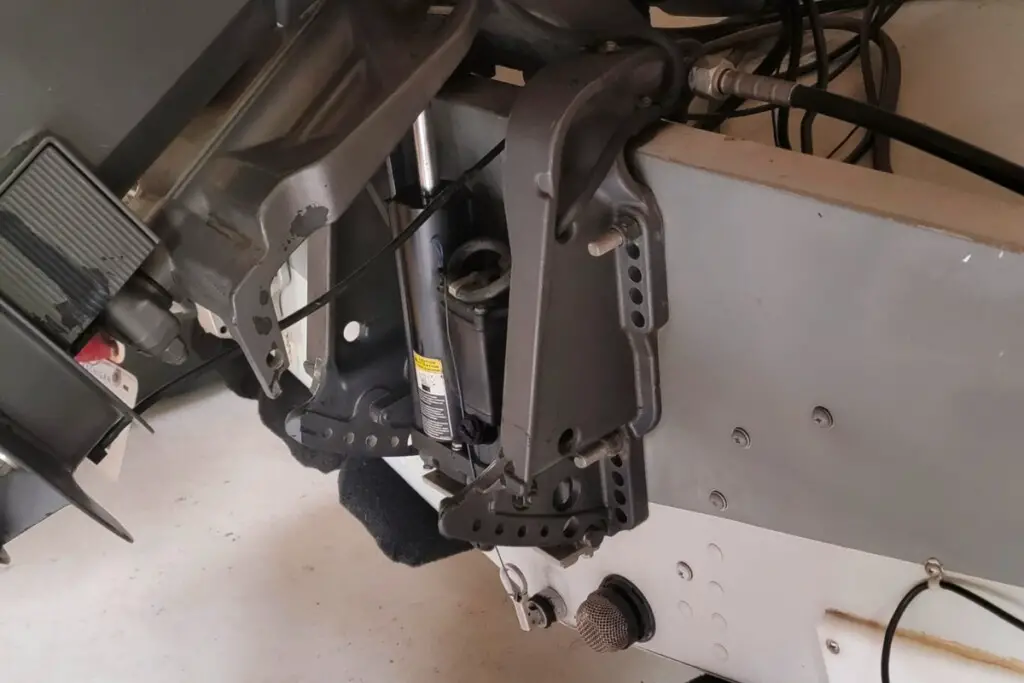
Make the boat and trailer level so that the trim/tilt motor is perpendicular to the ground (straight up and down). We do not want the trailer on a hill here. In order to fill the unit with hydraulic fluid, it was engineered to be filled only when perpendicular to the ground.
Step 2: Tilt Outboard Out/Up All the Way
To fill the unit, you will need to tilt the outboard out (or up) as far as it will go. If you’re like me, then this is where you’re having trouble and it won’t tilt for you. Here’s what you’ll need to do:
- Near the bottom of the trim/tilt motor housing on the side (see picture, mine is on the right), there will be a hole that leads to the manual release valve. Use the flat head screwdriver to release it. This will allow your outboard to be tilted by hand, but keep in mind that it’s heavy, so get a helper if needed.
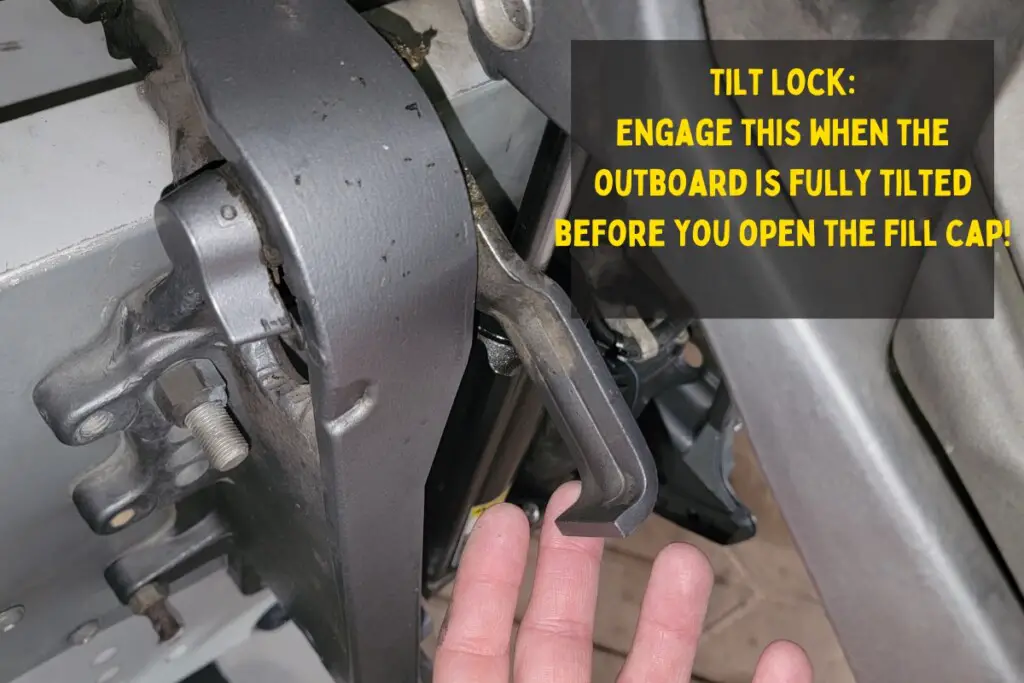
- Manually tilt the outboard out until you are able to engage the tilt lock (see picture) and allow the outboard to rest on the lock in the “up” or “out” position.
- Use the screwdriver to close the manual release valve.
Step 3: Remove the Fill Cap
With the outboard resting on the tilt lock, and the manual release valve closed, go ahead and slowly remove the fill cap (see picture) with the flat head screwdriver. You may hear air escape. In my case, I needed to leave the cap off for over 60 seconds before I finally heard air escape, so be patient.

Step 4: Fill with Hydraulic Fluid
Screw on the hand pump to the Power Trim and Tilt Fluid and insert the end of the narrow hose into the fill hole. Pump in fluid until it starts to leak out. Screw back on the fill cap.
Step 5: Bleed the Motor
With the fill cap back on, tilt the engine out (up) all the way and this should disengage the tilt safety (do it manually after tilting if it doesn’t). Now, “jog” the engine down by tilting the motor in (down) in 2 second bursts until it is all the way down and the lower unit can’t get any closer to the transom.
Once this is done, tilt it out (up) again in one long burst until it maxes out.
Repeat this process 3-5 times and end with the engine fully tilted in the out (up) position and engage the tilt lock.
Step 6: Recheck the Fluid
With the engine tilted back and the tilt lock engaged, slowly remove the fill cap again with the screw driver. You may hear air escape again. Just as a reminder, this is where I had to wait about a full minute before I heard air escape (must have been a bubble trapped somewhere).
Use the hand pump to add more Power Trim and Tilt Fluid to the fill hole until it oozes out.
Screw in the fill cap once again and repeat Steps 5 and 6 until when you go to recheck the fluid you only see fluid ooze out.
If you see nothing come out, add fluid.
If you see foamy and bubbly stuff come out, then that means you’ve still got air in the system so you’ll want to keep adding fluid until when you repeat Steps 5 and 6 you only see a little bit of fluid want to exit the fill hole. This will indicate that you are topped off with fluid and air has been purged out of the system.
Step 7: Double Check Fill Cap and Manual Release Valve Before Use
Now that your motor has been filled and the air bled out, you are just about ready to hit the water again. Wipe up any of the fluid that may have oozed out with a shop rag, and make sure the fill cap is properly tightened (don’t over-tighten, as it has a rubber seal and doesn’t need to be too tight), and make sure the manual release valve at the bottom has been engaged (should have already been done in Step 2).
Difference Between Trim and Tilt
My particular engine is equipped with a trim and tilt motor, and that begs the following question to a person newer to boating: what’s the difference between trim and tilt?
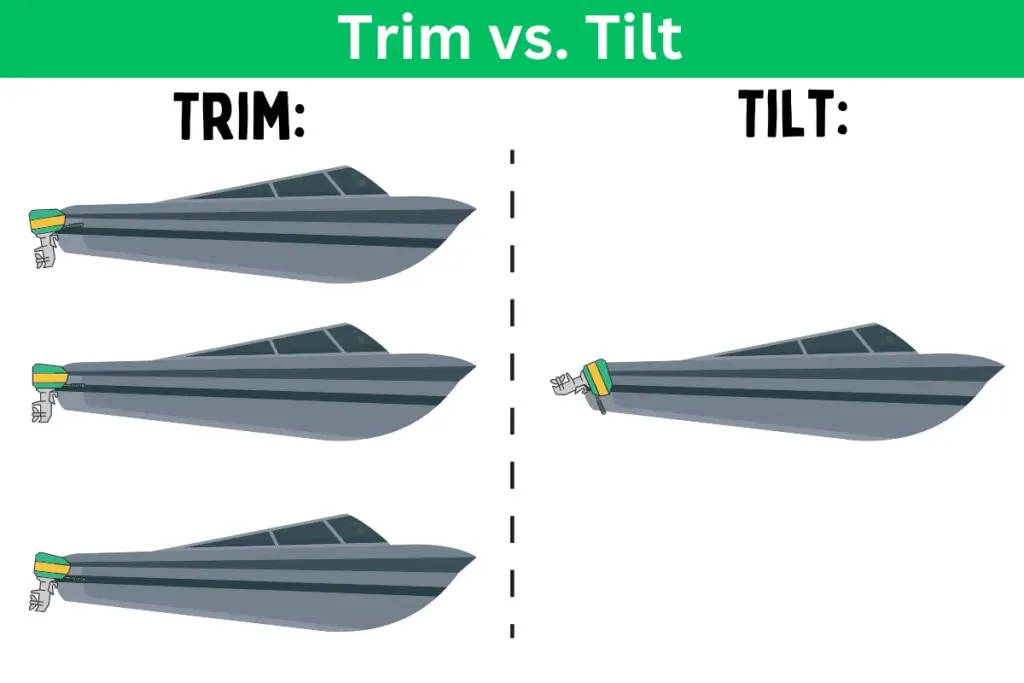
Essentially, tilting is the action of bringing the entire outboard out of the water for navigating the boat launch and transport. It becomes “tilting” when you’re no longer within the functional operational range of motion when the boat is underway on the water.
Trimming is when the outboard’s power drive (lower portion) is in the water and when you make small movements of the outboard (either in or out) to adjust the efficiency of how the boat is riding on the water at cruising speeds. The range of motion of “trimming” is only about 15-20 degrees.
When you go beyond that 15-20 degrees in the “out” position, it becomes “tilting”.
If you’re unsure about where the functional line is between “trimming” and “tilting”, you can easily hear the different hydraulics engage when you’re raising and lowering the unit. The motor will make a distinct change in pitch that even the untrained ear can distinguish.
Final Takeaways
The most common reasons for an outboard motor not tilting properly often involve issues such as low hydraulic fluid levels or air being trapped in the hydraulic system.
Thankfully, these problems can be addressed through diligent maintenance. This involves filling the tilt/trim motor with the right hydraulic fluid and carefully bleeding the system to expel any trapped air.
These maintenance procedures can generally be done using basic tools and by having a bit of patience. Regular upkeep, at least annually or as often as your engine’s manual suggests, is the best way to prevent problems with your tilt/trim motor.
Always ensure to use the manufacturer-recommended hydraulic fluid to avoid potential system damage and to not void your warranty.
After any fluid change, bleeding the tilt/trim motor is a recommended step to remove any air that might have been introduced during the process.
While these steps can be performed by anyone with a mechanical aptitude, if you’re unsure or uncomfortable, it’s always a good idea to seek assistance from a qualified marine mechanic or technician.
FAQs
Q: How often should I fill and bleed my tilt/trim motor? A: The frequency of filling and bleeding your tilt/trim motor depends on various factors such as usage, operating conditions, and manufacturer recommendations. It is generally advisable to perform this maintenance procedure at least once a year or as specified in your engine’s manual.
Q: Why is the fluid in my tilt/trim motor bubbly? A: Bubbles in the hydraulic fluid in your tilt/trim motor indicate too much air being in the system. You will need to properly fill the motor and bleed it of air until only liquid comes out with no bubbles.
Q: Can I use any type of fluid for my tilt/trim motor? A: No, it is crucial to use the hydraulic fluid specified by the manufacturer. Using the wrong type of fluid can result in damage to the system and may void any warranties. Always refer to the manufacturer’s recommendations for the correct fluid to use.
Q: What happens if there is air in the system and I don’t bleed it? A: Air trapped within the tilt/trim motor system can cause reduced performance, erratic operation, or even complete failure. Bleeding the system ensures that any air bubbles are removed, allowing the motor to function properly.
Q: Is it necessary to bleed the tilt/trim motor after every fluid change? A: Yes, it is recommended to bleed the tilt/trim motor after each fluid change to remove any air introduced during the process. This ensures optimal performance and prevents potential issues.
Q: Can I perform the filling and bleeding process myself, or should I seek professional help? A: The filling and bleeding process can be performed by individuals with mechanical aptitude and following proper instructions. However, if you are unsure or uncomfortable with the process, it is recommended to seek assistance from a qualified marine mechanic or technician.